Perspective is the simplest and most direct way of creating the illusion of
depth in a picture of spatially extended objects. The more or less correctly
placed vanishing points of parallel lines, the estimated regression of evenly
spaced points on a line, the elliptically compressed circles, all these tricks
of perspective do more than merely please the eye. They help the viewer guess
correctly where the artist meant to place things relative to each other. For
example, even a modest amount of perspective convergence prevents you from
mistaking a three-dimensional picture for a two-dimensional diagram.
Here I am speaking of linear perspective as opposed to aerial perspective.
The latter relies more on shading and shadows to give the
illusion of depth. Pictures in linear perspective also differ from drawings
based on an affine projection, where points in space are cast to the
picture plane along mutually parallel lines called the projecting rays, or
projectors for short.
Since our sun is so far away from earth we can consider its rays to be
parallel. Thus shadows on a flat plane are familiar examples
of affine projections.
Drawings 3D figures in affine projection is particularly easy to do, and often
such figure look somewhat realistic. So you have seen them countless number of
times in you mathematical textbooks, and your teachers drew such figures on the
blackboard (or whiteboard, nowadays.) We shall return to affine projections once
you have a grasp of perspective.
In an affine projections
there is no convergence: parallel lines in space remain parallel in the
picture. Mathematicians often call this a "parallel projection" but the
term should be avoided in the company of artists and draftsmen.
For them a parallel projection is a perspective projection in which the
principal plane of the
pictured object is parallel to the picture plane. An affine projection whose
projectors are perpendicular to the picture plane is called
an orthographic projection, otherwise it is called an oblique projection.
This is the generic meaning of "orthographic" although among architects,
for example, the term also refers to a composite of two or more
orthographic projections at right angles to each other. For the example the
plan and elevation of a building.
A discussion of aerial perspective and affine projection is part of the
complete exposition in "The Topological Picturebook".
The principle for drawing in perspective is deceptively simple. Painting from
life, the artist puts a dot on the canvas where there is a real point to be
seen from a fixed position of the eye. Geometrically, this is the point where
the line of sight between eye and object crosses the picture plane. Since
Albrecht Duerer and the Rennaissance, there has been a steady evolution of
ingenious mechanical devices for facilitating this projection.
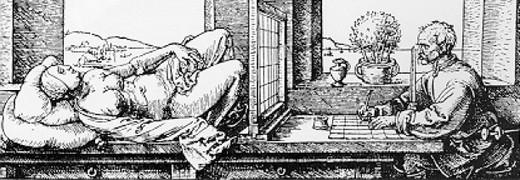
|
Figure 2: Alberti’s Veil
Duerer’s perspective on how to transfer points seen through the veil
to points on the canvas. |
Today, the
photographic camera takes effortless and perfectly perspective pictures of
actual scenes: landscapes, buildings, rooms and models. Inexpensive,
graphics-oriented microcomputers perform this task for virtual shapes whose
points have only mathematical existence.
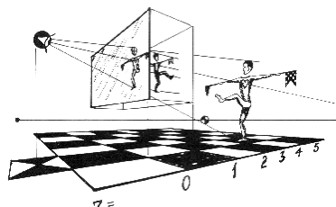
|
Figure 3: Heart of the Matter
A perspective illustration of the principle of linear perspective. |
How a computer draws in perspective
Choose Cartesian coordinates for
which the eye, at $ (0,0,-\delta)$, is located a
focal distance $ \delta $ behind the xy-picture plane $ z=0 $.
In computer graphics, the canvas is the vertical monitor screen, and
the z-axis is horizontal.
The perspective image, $ (X,Y,0) $ , of the
point $ (x,y,z) $ is scaled in proportion to its distance from
the canvas, $ Z = \frac{\delta}{\delta + z} $. Thus
$ (X,Y) = Z(x,y) = (xZ, yZ) $.
In this formulation we have compressed the object half space,
where $ z>0 $, into the region where $ 0 < Z < 1 $.
An artist might describe this reflection as being "in relief",
because the depths of the figures are greatly compressed in the
z-direction.
For example, the observer’s eye in Figure 3, at $ z=-1 $
sees the projected image, on the canvas $ z=0 $, of a dancer
at $ z=3 $, whose reflected relief (in the box) is sandwiched
between the picture plane and its parallel at $ z=1 $.
The transformation from space to reflected relief is invertible, because
we can solve the equations for the space coordinates
$ X = \frac{x\delta}{\delta + z} $ |
$ x = \frac{X}{Z} $ |
$ Y = \frac{y\delta}{\delta + z} $ |
$ y = \frac{Y}{Z} $ |
$ Z = \frac{\delta}{\delta + z} $ |
$ z = \delta \frac{1-Z}{Z} $ |
It could be argued that the recognition of a picture in perspective
involves a mental inference about the perspective scaling parameter
$ Z = \frac{\delta}{\delta + z $.
Drawing in perspective by hand
Before photography, and especially before computer graphics, the designer had
no choice but to use the classical methods of drawing with ruler and compass.
The discipline for this, descriptive geometry, was a required subject in
every engineering, architecture and industrial design curriculum.
Even so, considering the tedium of building physical models to be photographed,
the steep learning curve in using computer tools to design
irregularly curved surfaces, or of entering the millions of data points
needed by the computer to do it on its own, there are still many instances
when drawing by hand is still the better choice.
For convenience and speed, the perspective sketch is the best choice also
for descriptive topologists.
Instruction for drawing in perspective can be found in primers for students of
architecture, the fine arts, and industrial design (in order of increasing
utility). The architect rearranges familiar objects in a familiar universe;
the artist mostly draws from life. Only the designer faces problems similar to
those of the topologist: to (re)create the object in the act of drawing it.
Industrial and topological designers both strive to transmit visual information
with minimal ambiguity and maximal economy of style. The difference comes in
the nature of the pictured objects themselves. A teakettle or an automobile
is, after all, part of the viewer’s everyday experience. A picture of a new
object of this kind serves chiefly to "reset the parameters" of an idea already
in the imagination. Most pictures drawn by the topologist are of unfamiliar
objects. Only rarely do they correspond to any physical reality. While a
M\"obius band is easily made from a strip of paper, how to sew a disc to its
boundary is not a skill taught in the schools.
Hand-drawn perspective plays a special role in descriptive topology. Since
perspective cubes, cylinders and cones used for framing a drawing can be copied
from the computer screen, it is not absolutely essential. However, it does
help the topologist to visualize and then design the object in the first place,
by whatever means the finished product will be realized. Finally, I have found
that teaching projective geometry, especially to teachers,
artists and computer graphicists, is best done in terms of perspective drawing.
Comment
It is impractical here to present the theory of perspective from a historical
viewpoint. Instead, we start with Kepler’s concept of ideal points, lines and
planes, and the notion of a projective geometry based on this. Readers who have
a more extensive knowledge of projective geometry will be reminded, occasionally,
of what they already know. Readers familiar only with the earlier introduction
to this subject are invited to ignore such references.
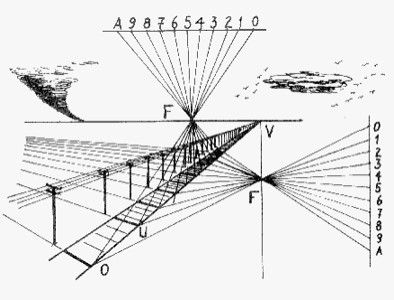
Vanishing points
Recall that projective space consists of ordinary 3-space augmented by an
ideal point for each set of mutually parallel lines. An ideal point
is joined to a real point by its representative through that point. Two ideal
points, represented by two non-parallel real lines, are joined by an
ideal line corresponding to the set of mutually parallel planes determined by
the two lines. These ideal lines and points reside on an ideal plane,
also thought of as the plane-at-infinity. In analogy to the
projective plane, whose points correspond to antipodal pairs of points on a
sphere under central projection, projective space has a Euclidean model in 4-space,
consisting of antipodally identified objects on the 3-sphere.
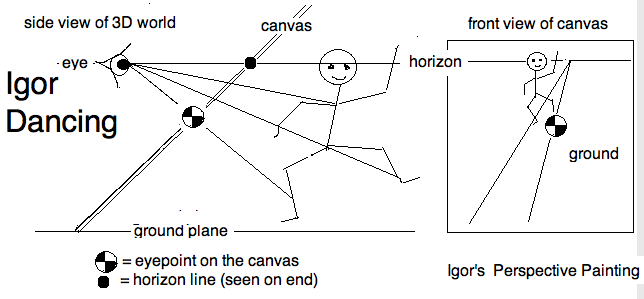
|
Figure 4: Igor Dancing: A geometric formulation of Alberti’s Veil |
That two parallel lines "meet at infinity" and that two parallel planes have a
common "infinite line" has the following perspective interpretation. The ray
emanating from the observer’s eye, the sight line, passes through the
image point on the canvas to the object point in space.
As the
object point at the end of the sightline moves away from the observer along a
straight line in space, its trace on the picture plane
moves along a line
segment until it stops at the vanishing point for the object line. This
happens when the sightline is parallel in space to the object line being drawn
in perspective. For this reason, the vanishing point remains
fixed as long as the object line moves parallel to itself in space. So, the
vanishing point, which is on the canvas, represents the ideal point on the
object line.
As long as the object line rotates in an object plane,
its vanishing point moves along a
line, called the horizon line for the object plane. In this way, the
horizon line on the canvas represents the ideal line on the object
plane in space. Thus the picture
plane comes into 1:1 correspondence with the ideal plane under a projection
along lines of sight. The sight line for a point moving along an object line
which is parallel to the picture plane becomes parallel to the picture plane.
So the vanishing point of an object line parallel to the picture plane must be
the ideal point of its picture. Its ideal line is the horizon for real planes
parallel to the picture plane. In a perspective drawing, only lines parallel
to the canvas remain parallel. Any other pair of objectively parallel lines
meet, in perspective, at their common vanishing point. A line parallel to
a plane vanishes on the horizon for that plane.
What follows is a sequence of lessons on drawing in perspective which are of
independent interest. They also illustrate a number of profound geometrical
ideas, which presented in a less pictorial ways soon loose their charm.
Computer assisted hand drawing
For practical and aesthetic reasons, we enlist the graphics computer
to assist drawing in the classical style; equivalent to drawing
board, T-square, rulers, pencil (and eraser), and india ink. Even if
the classical drawing instruments are used for the final work, the
ability of the computer to produce infinitely many different "what-if"
versions is already worth the additional effort. We will refer to
exercises to be done in KSEG and in iPaint (Paint). Other tools are
equally or even more useful, though the generally have a longer learning
curve, and a steeper ascent (and price.)